|
Size: 169
Comment:
|
Size: 5680
Comment:
|
| Deletions are marked like this. | Additions are marked like this. |
| Line 2: | Line 2: |
| This perspective is used to create/edit treebanks. Treebanks configured here may be used within the search-perspective. | The {{attachment:treebank_manager_perspective.png}} perspective is used to create/edit treebanks. Treebanks configured here may be used within the [[http://wiki.ims.uni-stuttgart.de/ICARUS-Search-Perspective|search-perspective]]. The latest implementation supports the following input types: * Tokenized Text * CoNLL 2009 * CoNLL 2006 * !TextCorpusFormat (TCF) 0.4 Treebank Overview: {{attachment:treebank_explorer.png||align="top"}} Note the "New Treebank" is marked with an {{attachment:treebank_explorer_error-icon.png||align="top"}} this indicates that there was no location set. 1. Adding a new Treebank using the {{attachment:add_treebank.png}} button. Use modification buttons {{attachment:treebank_edit-del-buttons.png}} to delete, rename or edit selected treebank. 1. After clicking the "Add new Treebank Button" {{attachment:add_treebank.png}} the treebank explorer dialog shows up: {{attachment:treebank_explorer_dialog.png||align="top"}} * Name: specify the Treebank Name that will show up in the treebank Overview. * Location: treebank location on the file system (local/network). * Reader: Reader for the current treebank. E.g.: CONLL09(gold), CONLL09(system) or TCF 0.4. * Properties: (currently not used) 1. Use {{attachment:treebank_load.png}} bottun to load the treebank. Afterwards it can be inspected clicking on {{attachment:treebank_inspect.png}} . The unload button {{attachment:treebank_unload.png}} will unload the treebank from the main memory. ==== Graph-List Outline ==== {{attachment:treebank_graph-outline.png}} This tab is used to show the sentence data when inspecting a treebank {{attachment:treebank_inspect.png}}: Graph-List Outline Toolbar: {{attachment:treebank_graph-outline-tb.png}} * {{attachment:preferences.png}} = Open the preferences * {{attachment:arc-layout.png}} = Change the current graph layout. There are three different layout types available {{attachment:qe_layouts.png||align="middle"}} 1. Arc layout {{attachment:qe_arc-layout.png||align="middle"}} 1. No layout {{attachment:qe_no-layout.png||align="middle"}} 1. Tree {{attachment:qe_tree-layout.png||align="middle"}} * {{attachment:clear.png}} = Clear graph panel - every nodes/edges are deleted * {{attachment:export.png}} = Save the current search graph to XML file (may be imported later) * {{attachment:import.png}} = Import a search graph XML file * {{attachment:print.png}} = Print the current graph * {{attachment:add-node.png}} = Add a new node to the current search graph * {{attachment:add-edge.png}} = Connects two nodes (two nodes must be selected before this action can be performed) * {{attachment:add-pedge.png}} = Connects two nodes with a precedence relation (two nodes must be selected before this action can be performed) * {{attachment:delete.png}} = Delete selected node/edge (multi selection possible) * {{attachment:edit.png}} = Open the edit node/edge dialog (Instead of using this button you may doubleclick a node/edge to open the edit dialog) * {{attachment:clone.png}} = Duplicate (copy and insert) the selected nodes/edges. Quick way to duplicate a graph. Note: edges are only copied when their source and target node is selected. * {{attachment:copy_button.png}} = Copy and the selected nodes/edges. Note: edges are only copied when their source and target node is selected. (strg+c) * {{attachment:paste_button.png}} = Paste previously copied nodes/edges. (strg+p) * {{attachment:reorder-graph.png}} = Redraw the graph, can be useful while adding new nodes, edges or constraints may mess up the graph layout. Example (arc-layout): (left nodes/edges unsorted; right nodes/edges reorderes) {{attachment:graph-redraw.png||align="middle"}} * {{attachment:undo.png}} = Undo the last graph editor operation * {{attachment:redo.png}} = Redo the last graph editor operation * {{attachment:zin.png}} = Increase zoom level * {{attachment:zdefault.png}} = Switch back to the default zoom level * {{attachment:zout.png}} = Decrease zoom level * {{attachment:zauto.png}} = Autofit zoom level to the current graph panel size (default off) * {{attachment:zcompress.png}} = Compress graph (right-left). Merge node/edge information into a node. Search annotation highlight is never merged and always visible. (default off) * {{attachment:hl_inedge.png}} = Highlight the incoming edge of the selected node (multiselection possible) (default off) * {{attachment:hl_outedge.png}} = Highlight the outgoing edge/edges of the selected node (multiselection possible) (default off) * Example where the node "son" is selected and highlight is switched on for incoming and outgoing edges {{attachment:hl_example.png||align"middle"}} Note: It is possible to navigate through a graph (after selecting at least one node/edge) using the "arrow keys" * {{attachment:treebank_tb-unused.png}} = unused right now ==== Treebank Properties Outline ==== At the very right is the "properties" outline. It consists of two different tabs. 1. Properties: The properties show some additional treebank information. For example, name, status (loaded). Also some Meta-Data is provided that includes the minimum, maximum and average sentence lengt as well as the total length (equal total token count) ([[attachment:treebank_properties-tab.png|{{attachment:treebank_properties-tab.png||height=100}}]] 1. Table Outline: A table representation of the graph shown in the Graph-List outline. [[attachment:treebank_table-outline.png|{{attachment:treebank_table-outline.png||height=100}}]] |
ICARUS Treebank Manager Perspective:
The  perspective is used to create/edit treebanks. Treebanks configured here may be used within the search-perspective.
The latest implementation supports the following input types:
- Tokenized Text
- CoNLL 2009
- CoNLL 2006
TextCorpusFormat (TCF) 0.4
Treebank Overview: 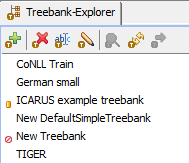 Note the "New Treebank" is marked with an
 ![]() this indicates that there was no location set.
this indicates that there was no location set.
Adding a new Treebank using the
 button. Use modification buttons
  to delete, rename or edit selected treebank.
 After clicking the "Add new Treebank Button"
 the treebank explorer dialog shows up:
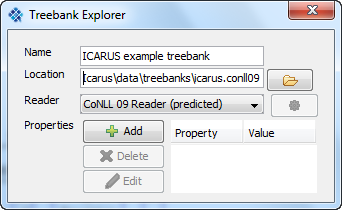
- Name: specify the Treebank Name that will show up in the treebank Overview.
- Location: treebank location on the file system (local/network).
- Reader: Reader for the current treebank. E.g.: CONLL09(gold), CONLL09(system) or TCF 0.4.
- Properties: (currently not used)
Use
 bottun to load the treebank. Afterwards it can be inspected clicking on
  . The unload button
  will unload the treebank from the main memory.
Graph-List Outline
 This tab is used to show the sentence data when inspecting a treebank
  :
:
Graph-List Outline Toolbar: 
 = Open the preferences
  = Change the current graph layout. There are three different layout types available
Arc layout

No layout

Tree
 = Clear graph panel - every nodes/edges are deleted
  = Save the current search graph to XML file (may be imported later)
  = Import a search graph XML file
  = Print the current graph
  = Add a new node to the current search graph
  = Connects two nodes (two nodes must be selected before this action can be performed)
  = Connects two nodes with a precedence relation (two nodes must be selected before this action can be performed)
  = Delete selected node/edge (multi selection possible)
  = Open the edit node/edge dialog (Instead of using this button you may doubleclick a node/edge to open the edit dialog)
  = Duplicate (copy and insert) the selected nodes/edges. Quick way to duplicate a graph. Note: edges are only copied when their source and target node is selected.
  = Copy and the selected nodes/edges. Note: edges are only copied when their source and target node is selected. (strg+c)
  = Paste previously copied nodes/edges. (strg+p)
  = Redraw the graph, can be useful while adding new nodes, edges or constraints may mess up the graph layout. Example (arc-layout): (left nodes/edges unsorted; right nodes/edges reorderes)
 = Undo the last graph editor operation
  = Redo the last graph editor operation
  = Increase zoom level
  = Switch back to the default zoom level
  = Decrease zoom level
  = Autofit zoom level to the current graph panel size (default off)
  = Compress graph (right-left). Merge node/edge information into a node. Search annotation highlight is never merged and always visible. (default off)
  = Highlight the incoming edge of the selected node (multiselection possible) (default off)
  = Highlight the outgoing edge/edges of the selected node (multiselection possible) (default off)
 Example where the node "son" is selected and highlight is switched on for incoming and outgoing edges
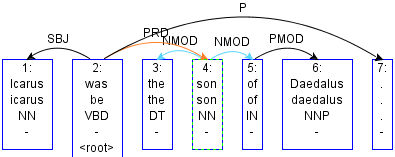 Note: It is possible to navigate through a graph (after selecting at least one node/edge) using the "arrow keys"
 = unused right now
Treebank Properties Outline
At the very right is the "properties" outline. It consists of two different tabs.
Properties: The properties show some additional treebank information. For example, name, status (loaded). Also some Meta-Data is provided that includes the minimum, maximum and average sentence lengt as well as the total length (equal total token count) (
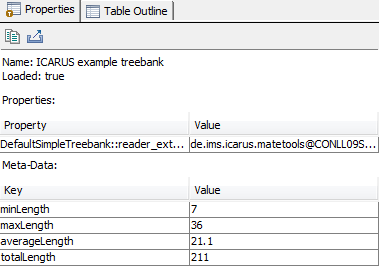
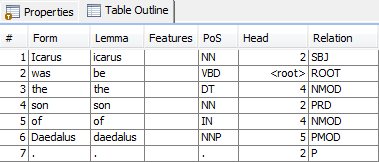
Table Outline: A table representation of the graph shown in the Graph-List outline.
